Argentine Beef Milanesa Recipe, Easy Argentine Dinner in 40 Minutes
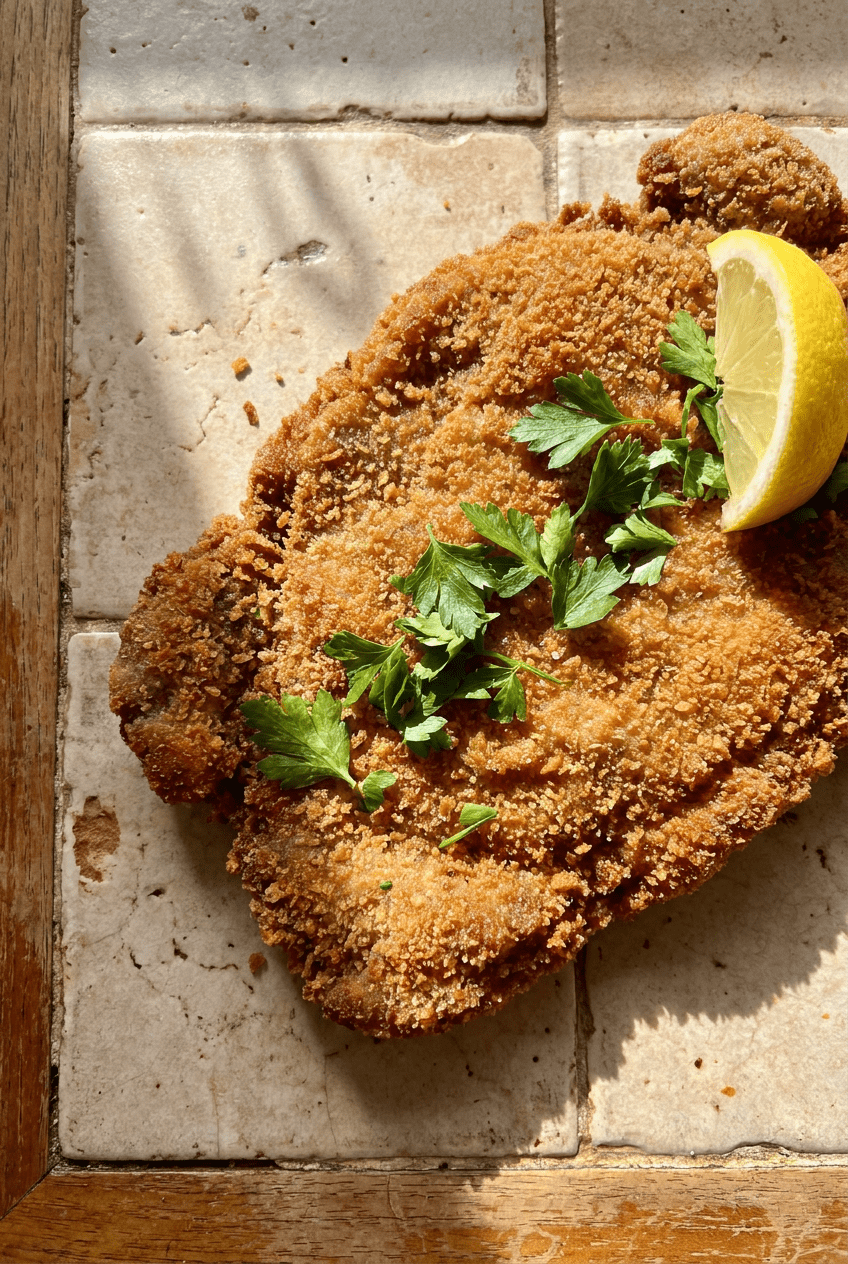
Table of Contents
- Argentine Beef Milanesa: Crispy golden beef cutlets pounded thin and fried to perfection, just like an Argentine abuela makes.
- Why You Will Love This Argentine Beef Milanesa Recipe
- Your Simple Ingredients for the Perfect Argentine Beef Milanesa Recipe
- How to Make Perfect Argentine Beef Milanesa
- Pro Tips and Easy Variations for Your Argentine Beef Milanesa
- Serving Suggestions for a Perfect Dinner
- Nutrition Information
- Storage and Make-Ahead Instructions
- Your Argentine Beef Milanesa Recipe Questions Answered
- More Incredible Argentine Recipes to Try
- The Story Behind This Recipe
- Pin This Recipe for Later
Argentine Beef Milanesa: Crispy golden beef cutlets pounded thin and fried to perfection, just like an Argentine abuela makes.
There are few things that instantly transport me back to the bustling streets of Buenos Aires quite like the sound of beef sizzling in hot oil and the unmistakable aroma of an authentic argentine beef milanesa recipe filling the kitchen. I still remember the first time I watched my friend’s grandmother, a tiny woman with flour-dusted hands and an impressive command of her cast-iron skillet, prepare this dish. She moved with a rhythm born from decades of practice, pounding the meat with casual precision, dipping it into egg as if painting a canvas, and laying it into shimmering oil with a satisfied hiss. The result was a towering stack of golden, shatteringly crisp cutlets that seemed to disappear the moment they hit the table. That memory, more than any cookbook, convinced me that this humble dish deserved a permanent spot in my own kitchen.
What makes this argentine beef milanesa recipe stand out from other breaded cutlets is the careful attention to texture and the simplicity of the technique. Unlike thicker schnitzels or heavy chicken fried steaks, this version relies on top round beef pounded to an even quarter-inch thickness, which cooks quickly and stays remarkably tender. The breading is a straightforward three-step process: flour, beaten egg with fresh parsley, and plain breadcrumbs. There are no fancy seasonings hiding the beef flavor, just enough garlic powder and salt to make the crust addictive. The frying is done in a shallow pool of vegetable oil at just the right temperature, so the milanesa develops a deep golden shell without soaking up grease. The final mandatory flourish is a generous squeeze of fresh lemon juice right before eating, which cuts through the richness and wakes up every single taste bud.
This recipe is perfect for anyone who craves a satisfying, nostalgic dinner that comes together in under an hour. It is ideal for busy weeknights when you want something that feels special but does not demand hours of prep. It is also fantastic for gatherings, because you can prepare the breaded cutlets ahead of time and fry them just before serving, filling the room with that irresistible fried aroma that brings everyone to the table. Whether you are introducing your family to Argentine comfort food for the first time or recreating a cherished memory, this milanesa delivers. And for a dessert that is as light as a cloud, try our fluffy Japanese souffle pancakes to finish the meal on a sweet, airy note.
Why You Will Love This Argentine Beef Milanesa Recipe
- Incredibly quick cooking. From pounding to plate, you are looking at about 40 minutes total for a complete dinner. The thin cutlets fry in just a few minutes per side, meaning you can have a hot, crispy meal faster than many takeout orders arrive.
- Perfectly crisp, never greasy. The flour-egg-breadcrumb sequence and a short chilling step create a coating that clings to the meat and fries into a shaggy golden crust. When the oil temperature is right, each cutlet emerges with a delicate crunch and no oily residue.
- Budget-friendly yet impressive. Top round is an affordable cut that transforms into something elegant when treated with a mallet and a hot skillet. Guests will think you spent far more time and money than you actually did.
- Endlessly customizable. The basic milanesa is a blank canvas. You can top it with tomato sauce and melted cheese for a Napolitana version, use chicken instead of beef, or serve it with chimichurri for a bold herbal kick.
- A taste of Argentine comfort. Every bite carries the soul of Buenos Aires home cooking. It is hearty, unpretentious, and meant to be shared with people you love around a noisy, happy table.
Your Simple Ingredients for the Perfect Argentine Beef Milanesa Recipe
Main
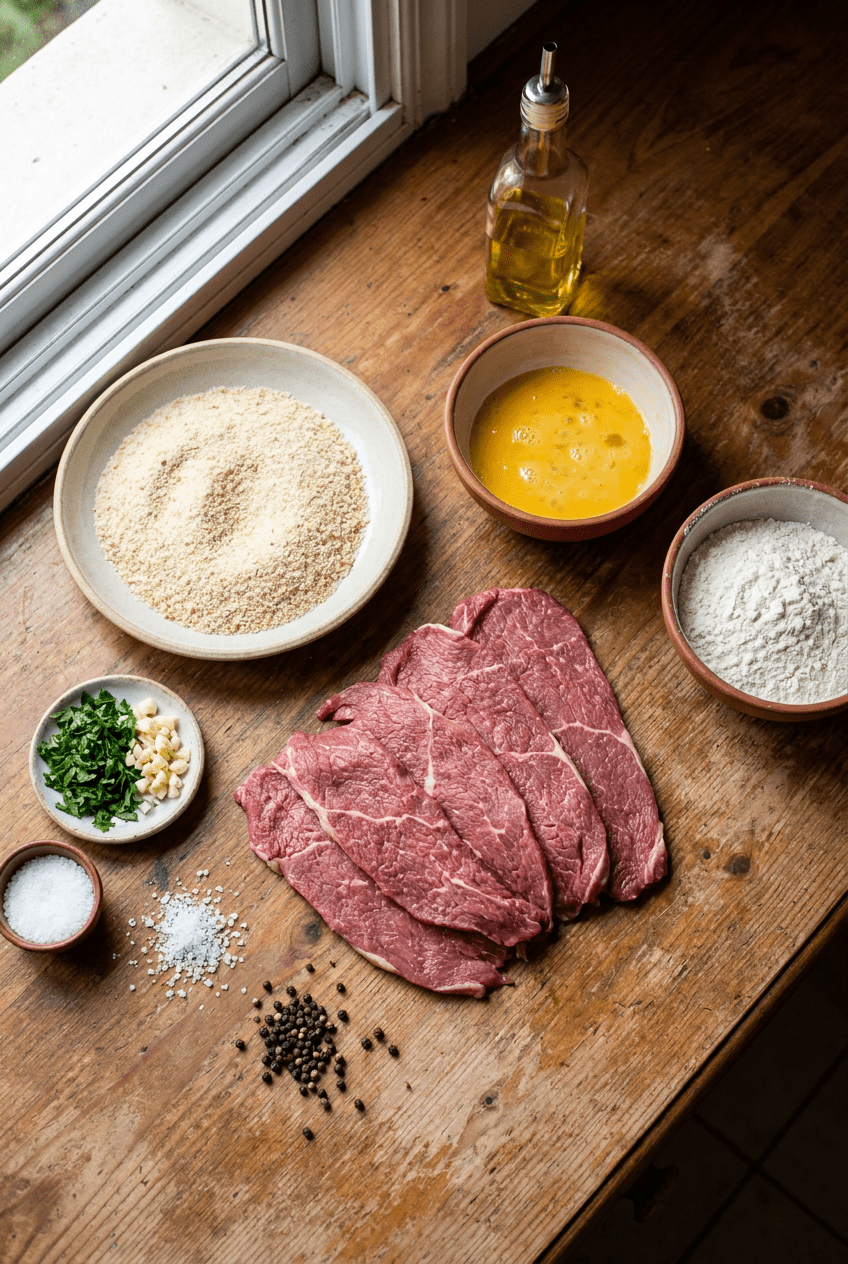
- 4 (4-6 oz each) beef top round steaks, cut 1/2 inch thick, excess fat trimmed
- 2 large eggs, beaten
- 2 cups plain breadcrumbs, seasoned or plain
- 1/2 cup all-purpose flour, for dredging
- 1 tsp garlic powder
- 1 tsp salt, plus more for seasoning
- 1/2 tsp black pepper, freshly ground
- 2 tbsp fresh parsley, chopped, plus more for garnish
- 1 cup vegetable oil, for frying, such as sunflower or canola
For Serving
- 1 lemon, cut into wedges
- to taste sea salt, flakey
Ingredient Notes
Beef top round steaks are the star of the show. Look for lean cuts with minimal marbling and no thick bands of connective tissue. Top round, eye of round, or sirloin tip all work beautifully because they stay tender after a quick pound and fry. Ask your butcher to slice them about half an inch thick, or do it yourself at home with a sharp knife. If you can only find thicker steaks, you will simply need to pound them a bit longer. Avoid cuts like chuck or brisket, which have too much collagen and will turn tough.
Eggs act as the glue that holds the breadcrumb coating to the meat. Beat them thoroughly until the whites and yolks are blended, then stir in the chopped fresh parsley. This adds tiny green flecks of flavor directly into the crust. Use large eggs at room temperature for the smoothest dip.
Breadcrumbs give milanesa its signature texture. Plain, unseasoned breadcrumbs allow you to control the salt and spice levels, but if you only have Italian-style seasoned crumbs, they will still work, just reduce the added salt slightly. For an extra craggy crust, you can use panko, though traditional Argentine milanesa leans toward finer crumbs. Fresh homemade breadcrumbs are fantastic if you have stale bread on hand.
All-purpose flour is the first layer of the breading station. It dries the surface of the meat so the egg adheres evenly. You don’t need a thick coating, just a light dusting. Too much flour can create a pasty barrier, so always shake off the excess.
Garlic powder and black pepper season the flour mixture delicately. Freshly ground black pepper has a brighter, more floral bite than pre-ground. The garlic powder should be pure, not garlic salt, to avoid oversalting. Together they give the crust a subtle savory backbone without overpowering the beef.
Fresh parsley brings a mild herbal freshness that cuts through the richness. Flat-leaf Italian parsley is preferred for its robust flavor, but curly parsley works in a pinch. Chop it finely so it disperses evenly through the egg wash.
Vegetable oil with a high smoke point is essential. Sunflower oil is the classic choice in Argentine kitchens, but canola, grapeseed, or a light olive oil blend all perform well. You need enough oil to come about a quarter inch up the sides of the skillet so the milanesa fries, rather than steams, to golden crispness.
Lemon and flakey sea salt are the finishing touches that transform a good milanesa into a great one. The acidity of fresh lemon juice brightens the fried crust, while a final pinch of coarse salt right before eating adds little bursts of crunch and salinity.
How to Make Perfect Argentine Beef Milanesa
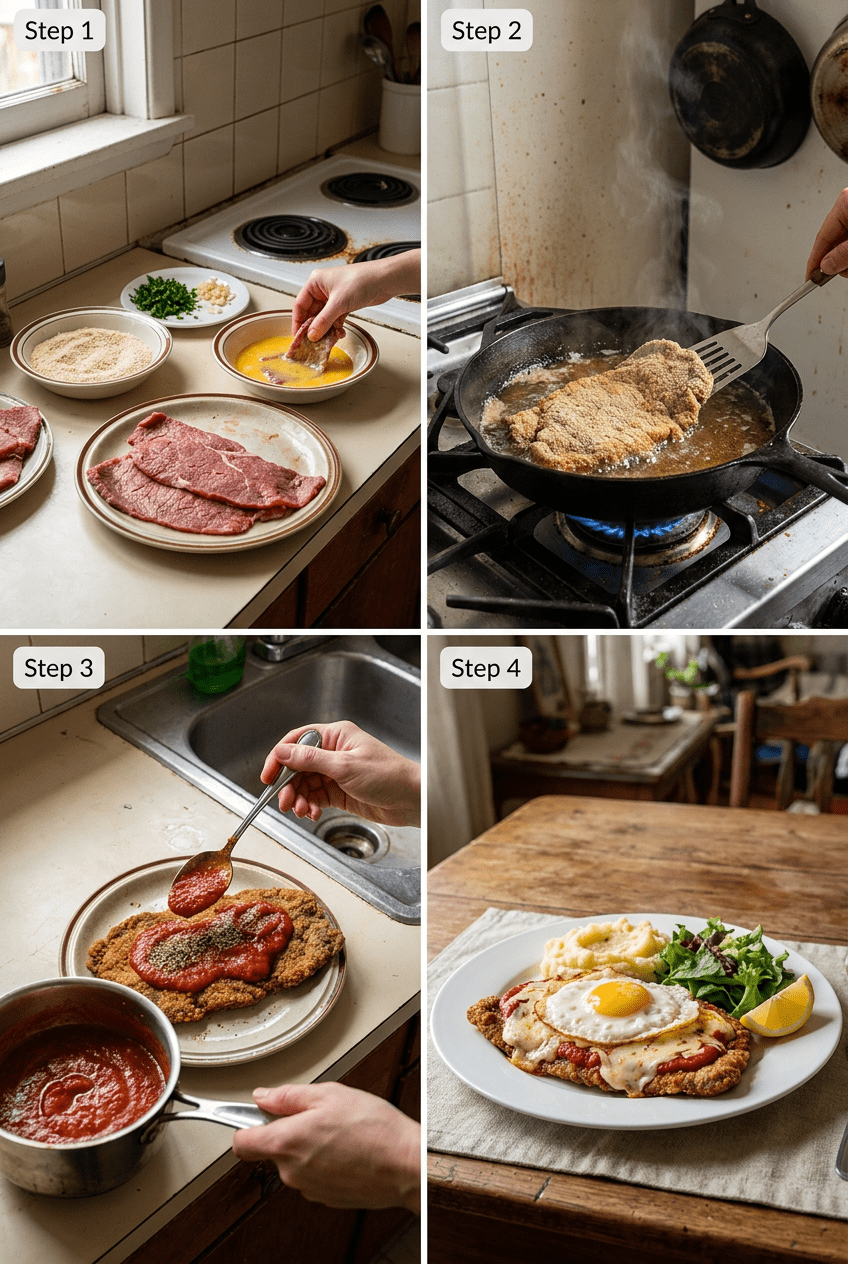
Phase 1: Prepare the Beef
Pound the Beef
Place each steak between two sheets of plastic wrap or parchment paper. Using a meat mallet or rolling pin, gently pound to an even 1/4-inch thickness, working from the center outwards. You want the cutlet to become wider and uniformly thin, not torn or shredded. Season both sides with a pinch of salt, pepper, and a light dusting of garlic powder. The meat should feel supple and flexible when lifted; if it starts to tear, you are pounding too hard or too much in one spot. Pounding against the grain is key for tenderness.
Pro tip: Pounding evenly ensures quick, uniform cooking and tender texture. Don’t overdo it—you want thin, not shredded. Listen for a gentle tapping sound, not a violent slam. After pounding, the steaks will look significantly larger, which is exactly what you want.
Phase 2: Build the Breading Station
Set Up Breading Station
Prepare three shallow dishes. In the first, combine the flour with remaining garlic powder, salt, and pepper, whisking with a fork to distribute evenly. In the second, beat the eggs until no streaks of white remain and stir in the chopped parsley. The third dish holds the plain breadcrumbs. Line a baking sheet with a wire rack and place it nearby. Adopt the one-hand-for-dry, one-hand-for-wet method to keep your fingers from turning into breaded claws. Use your left hand to handle the flour and breadcrumb steps, and your right hand for the egg dip, or vice versa.
Pro tip: This simple organization saves time and mess. If the flour gets clumpy, it is fine. If you see excess parsley settling, give the egg a quick whisk before each dip.
Phase 3: Bread the Cutlets
Bread the Cutlets
Working one at a time, coat a steak lightly in the seasoned flour, lifting it and shaking gently to remove any loose powder. The surface should look dry and pale, not clumpy. Submerge it in the egg mixture, letting the excess drip off for a few seconds. Then lay it directly onto the breadcrumbs. With your dry hand, pile some crumbs on top and press down firmly, turning to coat both sides thoroughly. The pressure helps the crumbs adhere. Place the breaded cutlet on the wire rack and repeat with all steaks. Refrigerate them uncovered for 10 minutes. This rest period allows the coating to hydrate slightly and firm up, which prevents it from blowing off in the hot oil.
Pro tip: For an even crunchier crust, you can double-bread after the first coat has rested: dip again in egg and crumbs. This yields a thicker, extra shaggy coating reminiscent of a traditional Argentine milanesa served at a classic bodegón.
Phase 4: Fry to Golden Perfection
Heat Oil and Fry
In a large skillet, pour the vegetable oil and set it over medium-high heat. You are aiming for about 350°F or 175°C, the point where the oil shimmers and a breadcrumb tossed in sizzles immediately with lively bubbles. Carefully lay one or two cutlets into the pan without crowding. They should not touch or overlap. Fry for 2 to 3 minutes on the first side until the edges are deeply golden and the underside is a beautiful walnut brown. Flip with tongs and fry the second side for another 2 minutes, until the beef reaches an internal temperature of 145°F (63°C) and the crust is uniformly crisp. Transfer to a paper towel-lined plate and immediately sprinkle with a little salt. The sound of the hot milanesa meeting the salt is one of the best parts of cooking.
Pro tip: Keep the oil temperature steady. If it drops too low, the milanesa will soak up oil and become heavy. If it smokes, it is too hot and the breadcrumbs will burn before the meat cooks. Use a meat thermometer to confirm doneness without cutting into the crust. A cooling rack set over a baking sheet in a 200°F oven will keep finished milanesas warm and crisp while you fry the rest.
Phase 5: Serve Immediately
Serve
Arrange the milanesas on plates with lemon wedges on the side. Just before eating, squeeze the fresh lemon juice directly over the hot cutlets and scatter a few extra parsley leaves if you like. The lemon hits the crust and lifts the whole dish, while the flakey sea salt adds a final textural pop. Serve right away while the crust is at its shatteringly crisp peak.
Pro Tips and Easy Variations for Your Argentine Beef Milanesa
Pro Tips
- Choose the right cut. Top round, eye of round, or sirloin tip are lean and tender when pounded thin. Steer clear of heavily marbled cuts or anything with a thick tendon line, which will shrink and turn chewy.
- Chill the breaded cutlets. Even a brief 10-minute rest in the refrigerator sets the coating and dramatically reduces the chance of the breading slipping off during frying. It is a small step that makes a big difference.
- Monitor oil temperature closely. A candy or instant-read thermometer takes the guesswork out. If you don’t have one, use the breadcrumb test: a crumb should sizzle vigorously and rise to the surface within seconds. Adjust heat as needed between batches.
- Fry in batches and keep warm correctly. Overcrowding lowers the oil temperature and steams the crust. Place finished milanesas on a wire rack over a baking sheet in a 200°F oven. Never stack them or put them directly on paper towels while waiting, or the bottom will turn soggy.
- Salt immediately. Seasoning the milanesa the moment it comes out of the oil helps the salt stick and enhances flavor. Use flakey sea salt for a delicate crunch.
Delicious Variations
- Milanesa Napolitana. Top the fried milanesa with a spoonful of tomato sauce, a slice of ham, and a layer of mozzarella cheese, then broil until bubbly and golden brown. This is a beloved Argentine classic that turns a simple cutlet into a knife-and-fork feast.
- Chicken Milanesa. Substitute boneless skinless chicken breasts pounded to an even quarter-inch thickness. Cooking time may be slightly longer, so use a meat thermometer to ensure the chicken reaches 165°F (74°C) while keeping the crust a deep gold.
- Garlic-Herb Crumb. Mix finely minced fresh garlic, chopped oregano, and a pinch of red pepper flakes into the breadcrumbs for a more aromatic crust. This variation pairs beautifully with a side of creamy mashed potatoes.
- Gluten-Free Milanesa. Use gluten-free all-purpose flour and gluten-free breadcrumbs or crushed rice cereal. The technique remains exactly the same, and the result is just as crunchy.
For a completely different culinary adventure, make sure to check out our Moroccan chicken tagine recipe, a fragrant stew that is slow-cooked to tender perfection. It makes a wonderful companion to this milanesa when you want to explore global comfort foods.
Serving Suggestions for a Perfect Dinner
In Argentina, milanesa is almost always served with a pile of golden French fries, a simple green salad, or a combination of both. The classic salad is nothing more than fresh arugula and sliced tomatoes tossed with good olive oil and a squeeze of lemon, which echoes the bright acid on the cutlet. You could also serve it with a crusty baguette to catch any escaping juices. For drinks, a chilled glass of Torrontés or a light Malbec complements the richness beautifully, while a sparkling water with lemon keeps things refreshing.
This dish is tailor-made for casual family dinners, Sunday suppers, or even a laid-back gathering with friends. To feed a crowd, simply scale up the ingredients and keep finished milanesas warm in the oven on a wire rack set over a baking sheet. You can also set up a milanesa bar with various toppings: sliced tomatoes, fresh mozzarella, arugula, and dollops of chimichurri so everyone can customize their plate. For dessert, consider our fluffy Japanese souffle pancakes, which provide a light, airy contrast to the crispy main course.
Nutrition Information
(Approximate per serving, 4 servings total) Calories: 480, Fat: 24g, Carbohydrates: 28g, Protein: 38g, Fiber: 1g, Sodium: 620mg. Nutritional values are estimates only.
Storage and Make-Ahead Instructions
- Refrigerator: Store cooked milanesa in an airtight container for up to 3 days, though the crust will lose its crispness. Place a paper towel at the bottom to absorb excess moisture and keep the cutlets in a single layer if possible.
- Freezer: Freeze uncooked breaded cutlets on a parchment-lined tray until solid, then wrap individually in plastic wrap and aluminum foil. They will keep for up to 1 month. Fry straight from frozen, adding 1 to 2 minutes per side and ensuring the internal temperature is safe.
- Reheating: The best way to restore crunch is to place the milanesa on a wire rack set over a baking sheet and reheat in a 375°F oven for 10 to 12 minutes. Avoid the microwave, which turns the crust rubbery.
- Make-Ahead: You can pound, bread, and chill the cutlets up to 4 hours in advance. Keep them on the wire rack in the refrigerator, covered loosely with plastic wrap. Fry just before serving. The flour mixture and egg wash should be prepared fresh for the best adhesion.
Your Argentine Beef Milanesa Recipe Questions Answered
Why does my breading fall off during frying?
Ensure the cutlets are dry before flouring, shake off excess flour gently, and let the breaded cutlets rest in the fridge for at least 10 minutes. Overcrowding the pan also disrupts the crust, so fry in small batches.
Can I bake milanesa instead of frying?
Yes, spray breaded cutlets generously with oil on both sides and bake at 425°F for 10 to 12 minutes per side until golden and cooked through. The crust will be less evenly crisp than frying, but the end result is still very satisfying.
What is the best cut of beef for milanesa?
Top round, eye of round, or sirloin tip are ideal. They are lean, tender when pounded thin, and won’t become tough. Avoid cuts like chuck or brisket with heavy marbling or connective tissue.
How do I know when the oil is hot enough?
Use a thermometer to maintain 350°F (175°C). If you don’t have one, drop a breadcrumb into the oil; it should sizzle immediately and float. Also look for a shimmering surface and a faint wisp of white smoke.
Can I use a different type of meat?
Absolutely. Chicken breast pounded thin is the most popular variation. Pork loin or veal cutlets also work wonderfully, though cooking times may vary slightly. Always check internal temperature for safety.
What if my milanesa is browning too fast but the meat is undercooked?
Lower the heat immediately. The oil may be too hot, causing the crust to burn before the interior is ready. Finish cooking in a 350°F oven for a few minutes to gently bring the beef to temperature without further browning the crust.
Is double breading necessary?
It is not necessary, but it does create a thicker, crunchier crust similar to what you might find in a traditional Argentine restaurant. If you love texture, it is worth the extra step.
How can I make this recipe dairy-free or gluten-free?
The recipe is naturally dairy-free. For gluten-free, use gluten-free all-purpose flour, gluten-free breadcrumbs, and ensure all other ingredients are certified gluten-free. The method remains unchanged.
Can I prepare the breaded cutlets the night before?
It is not recommended because the coating can become gummy and the meat may release
Argentine Beef Milanesa
Ingredients
Method
- Place each steak between two sheets of plastic wrap or parchment paper. Using a meat mallet or rolling pin, gently pound to an even 1/4-inch thickness, working from the center outwards. Season both sides with a pinch of salt, pepper, and garlic powder.
- Prepare three shallow dishes: one with flour seasoned with remaining garlic powder, salt, and pepper; one with beaten eggs mixed with chopped parsley; one with breadcrumbs.
- Working one at a time, coat a steak lightly in flour, shaking off excess. Dip into the egg, letting excess drip off, then press firmly into the breadcrumbs, turning to coat both sides thoroughly. Place breaded cutlets on a wire rack and refrigerate for 10 minutes to set the coating.
- In a large skillet, heat vegetable oil over medium-high heat until shimmering (about 350°F/175°C). Carefully lay 1 or 2 cutlets into the pan without crowding. Fry for 2-3 minutes per side until deep golden brown and beef reaches an internal temperature of 145°F/63°C. Transfer to a paper towel-lined plate and immediately sprinkle with a little salt.
- Arrange on plates with lemon wedges on the side. Squeeze fresh lemon juice over the hot milanesa just before eating, and garnish with extra parsley if desired.
Disclosure: This post may contain affiliate links. If you purchase through our links we may earn a small commission at no extra cost to you.
If you made this Argentine Beef Milanesa, please leave a comment below and let me know how it turned out.