Classic Beef Pot Roast Recipe, Easy American Dinner in 4 Hours
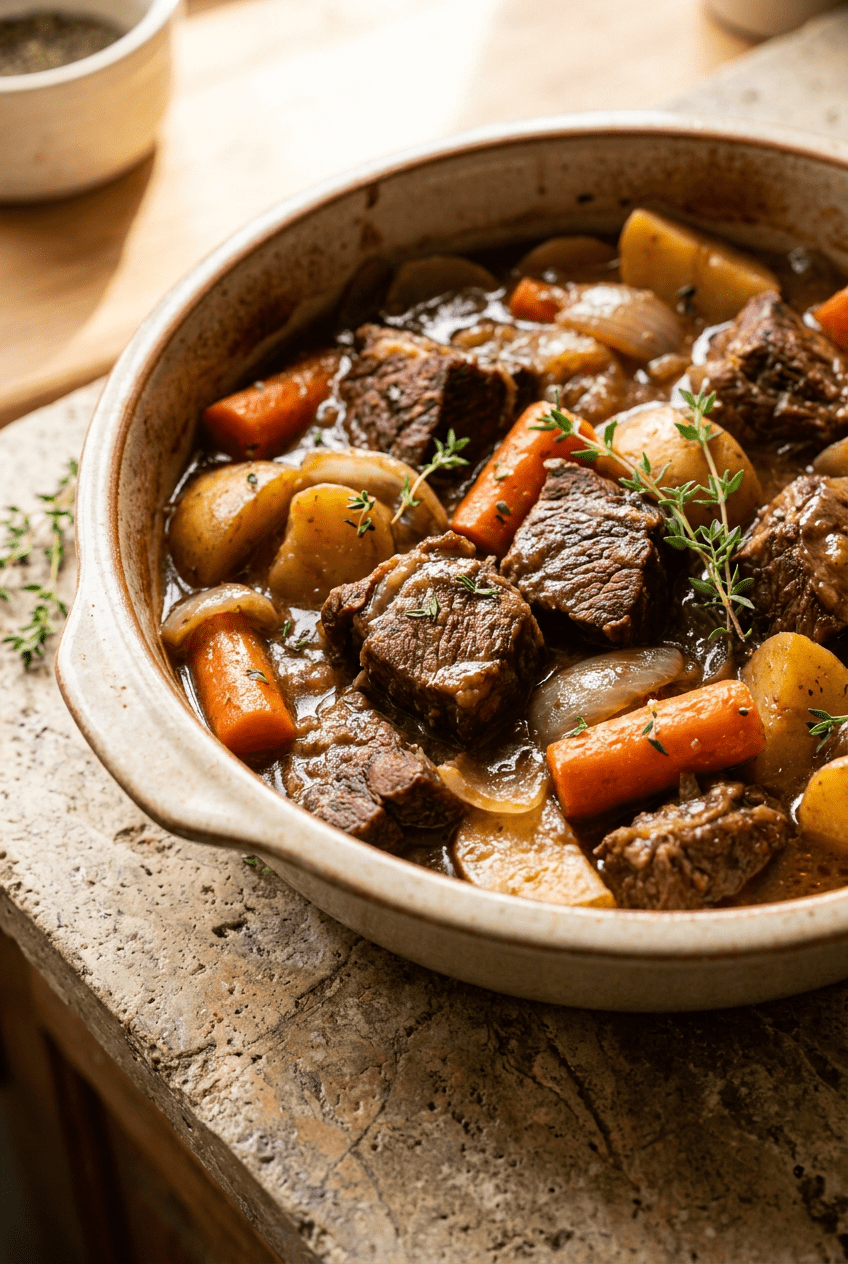
Table of Contents
- Classic Beef Pot Roast: Tender, melt-in-your-mouth beef braised low and slow with root vegetables in a rich, savory gravy.
- Why You Will Love This Classic Beef Pot Roast Recipe
- Your Simple Ingredients for the Perfect Classic Beef Pot Roast
- How to Make the Best Classic Beef Pot Roast Recipe
- Pro Tips and Easy Variations for Your Classic Beef Pot Roast
- Serving Suggestions
- Nutrition Information
- Storage and Make-Ahead Instructions
- Your Classic Beef Pot Roast Questions Answered
- More Incredible American Recipes to Try
- The Story Behind This Recipe
- Pin This Recipe for Later
Classic Beef Pot Roast: Tender, melt-in-your-mouth beef braised low and slow with root vegetables in a rich, savory gravy.
There is nothing quite like a classic beef pot roast recipe to fill the house with the deep, savory aroma of slow-braised beef and root vegetables on a chilly afternoon. I can still picture my grandmother’s kitchen on a Sunday, the heavy blue enamel pot sitting on the stovetop, steam curling up from under the lid while we all waited, forks in hand, for that first tender bite. This dish is more than just a meal, it is a feeling of warmth and togetherness, one that turns an ordinary day into something special. The magic lies in the unhurried cooking, the way a relatively tough cut of meat transforms into something so spoonably soft, its fibers practically sighing apart. It is the original slow food, and every time I make it, I am transported right back to that table, surrounded by family, sopping up every last drop of gravy with a piece of crusty bread.
What sets this particular recipe apart is the depth of flavor built from start to finish. We begin with a deep, mahogany sear on the beef that creates a rich fond at the bottom of the pot, then we layer aromatics, tomato paste, and a full cup of dry red wine that we reduce until concentrated and almost jammy. The braising liquid is a careful balance of beef broth and Worcestershire sauce, perfumed with fresh thyme and bay leaves, and it all simmers together for hours in a low oven until the chuck roast reaches that perfect state of collapse. There are no shortcuts here, but every step is simple and purposeful, designed to deliver a gravy that tastes like it took all day, because it did, in the very best way. This is the kind of recipe you will want to make on a lazy weekend, when you can be around to catch those incredible smells drifting from the kitchen.
I think you will find that this classic beef pot roast recipe is just right for anyone who craves a deeply comforting, homemade American dinner. It is wonderful for Sunday suppers, holiday gatherings when you want something less fussy than a standing rib roast, or even a Wednesday meal that you start before lunch and let the oven do the work while you carry on with your afternoon. The hands-on time is brief, the reward immense. If you have ever wanted to make something that feels like a warm hug on a plate, this is it. And if you are in the mood for another showstopping comfort dish, you might also enjoy my Moroccan chicken tagine, which similarly transforms humble ingredients into something extraordinary through patient, gentle cooking.
Why You Will Love This Classic Beef Pot Roast Recipe
- Incredibly tender, fall-apart beef. The long, slow braise breaks down the connective tissue in the chuck roast, turning it into meat so tender you can cut it with a spoon. Every bite is succulent and deeply beefy.
- A gravy that tastes like liquid gold. Because we build flavor through careful searing, deglazing with wine, and then simmering everything together, the resulting gravy is intensely savory and rich. It coats the meat beautifully and is reason enough to make this dish.
- Straightforward, no-fuss method. There are no complicated techniques here. You sear, you sauté, you simmer in the oven, and then you whisk together a simple butter and flour roux to finish the gravy. Even a novice cook can follow along with confidence.
- Perfect for feeding a crowd. This recipe serves eight generously, and it scales easily if you have a larger pot. The presentation, a whole roast sliced and arranged on a platter surrounded by vegetables and drizzled with gravy, is always met with oohs and ahhs.
- Make-ahead friendly and freezer safe. The flavors actually deepen overnight, making this an ideal dish to prepare a day in advance. You can also freeze portions with gravy for a future emergency comfort meal.
- Versatile vegetable options. While the recipe calls for carrots, celery, and onion, you can easily add potatoes, parsnips, or turnips for a complete one-pot dinner. The root vegetables soak up the braising liquid and become candy-sweet.
Your Simple Ingredients for the Perfect Classic Beef Pot Roast
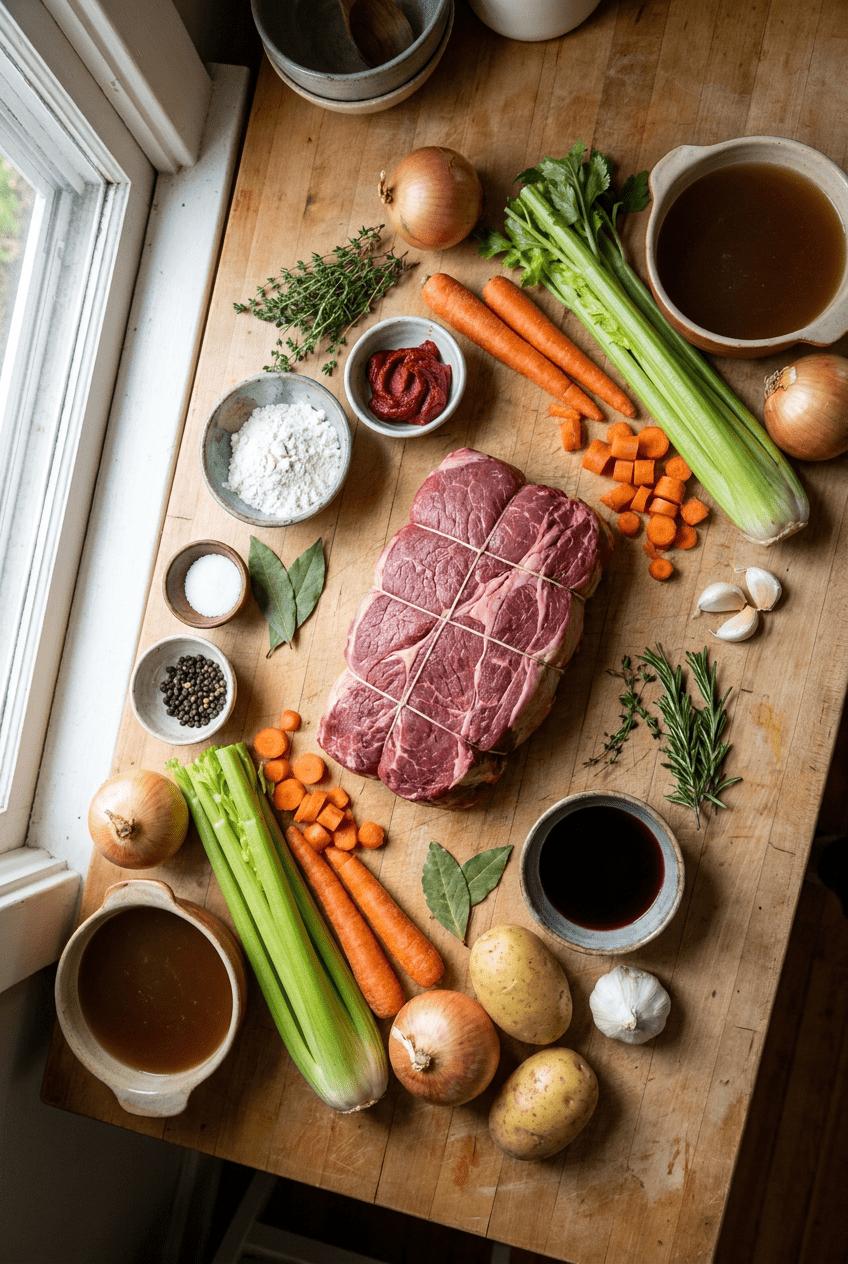
Main
- 3 to 4 lbs beef chuck roast, trimmed of excess fat, tied if uneven
- 1 tbsp kosher salt
- 2 tsp black pepper, freshly ground
- 3 tbsp vegetable or avocado oil, divided
- 2 large yellow onions, peeled, cut into thick wedges
- 4 medium carrots, peeled, cut into 2-inch chunks
- 3 stalks celery, cut into 2-inch chunks
- 6 cloves garlic, smashed and peeled
- 3 tbsp tomato paste
- 1 cup dry red wine, like Cabernet or Merlot
- 2 cups beef broth, low sodium
- 1 tbsp Worcestershire sauce
- 4 sprigs fresh thyme, or 1 tsp dried
- 2 bay leaves
Gravy (to finish)
- 2 tbsp unsalted butter, softened
- 2 tbsp all-purpose flour, or 1 tbsp cornstarch mixed with 1 tbsp water for gluten-free
- salt and pepper, to taste
Ingredient Notes
Beef chuck roast. This is the ideal cut for pot roast because it comes from the shoulder and has a generous amount of marbling and connective tissue, which melts into gelatin during the long braise, creating that unctuous, fork-tender texture. Look for a roast that is evenly thick so it cooks uniformly, and if one end is much thinner, do as butchers do and fold it over, tying it with kitchen twine to create an even shape. You can substitute brisket or bottom round, but the result will be slightly less lush, so chuck is always my first choice.
Kosher salt and black pepper. Seasoning the meat aggressively before searing is essential. Kosher salt has larger crystals than table salt and clings to the surface, drawing out just enough moisture to help form a crust. I prefer freshly ground black pepper for its floral, pungent bite. Do not be shy here, season every side of the roast as if you mean it.
Vegetable or avocado oil. You need an oil with a high smoke point so you can get the pot nice and hot for that crucial sear without burning the oil. Avocado oil is my favorite because it is neutral and handles heat beautifully, but vegetable oil works perfectly too. You will use a little in the beginning, then a bit more for the vegetables.
Yellow onions. Onions provide a sweet, aromatic backbone to the braise. I cut them into thick wedges rather than dice so they hold their shape and become almost spreadable after hours in the oven. You could use white onions, but yellow are sweeter and more mellow once cooked.
Carrots and celery. These are classic mirepoix vegetables. The carrots add natural sweetness and the celery contributes a subtle savory earthiness. Cut them into chunky 2-inch pieces so they do not completely disintegrate. Some recipes call for leaving the celery large and discarding it later, but I like to serve the softened carrots alongside the beef.
Garlic. Six whole cloves, smashed with the flat of your knife and peeled, infuse the braising liquid with a gentle garlic perfume without being overpowering. Smashing releases their oils but keeps them intact enough to fish out later if you wish. If you adore garlic, feel free to toss in a few more.
Tomato paste. Cooking the tomato paste in the residual oil after the vegetables have softened caramelizes its natural sugars and adds a deep, savory umami note to the final gravy. Do not skip this step, that one minute of stirring makes a noticeable difference. In a pinch, you can use an extra tablespoon of tomato paste from a tube.
Dry red wine. A cup of dry red wine like Cabernet Sauvignon or Merlot brings acidity and complexity. When you reduce it by half, the harsh alcohol cooks off, leaving behind concentrated fruit and tannins that complement the richness of the beef. If you prefer not to use wine, you can substitute an equal amount of additional beef broth plus a tablespoon of red wine vinegar.
Beef broth and Worcestershire sauce. Low-sodium broth allows you to control the saltiness, and Worcestershire sauce adds a fermented, tangy depth that makes the gravy taste impossibly good. Together they form the bulk of the braise, so use a quality broth you trust.
Fresh thyme and bay leaves. These earthy herbs steep into the liquid as it cooks, providing a subtle, woodsy layer. Fresh sprigs are easiest to remove at the end, but dried thyme works just fine. Bay leaves are non-negotiable for me, they lend a faint tea-like note that rounds out the whole dish.
Butter and flour (or cornstarch). The finishing step for the gravy is a simple roux or slurry. I use equal parts softened butter and all-purpose flour, whisked into the drippings to create a silky, full-bodied gravy. For a gluten-free version, a cornstarch slurry dissolved in cold water works beautifully and gives a glossy finish.
How to Make the Best Classic Beef Pot Roast Recipe
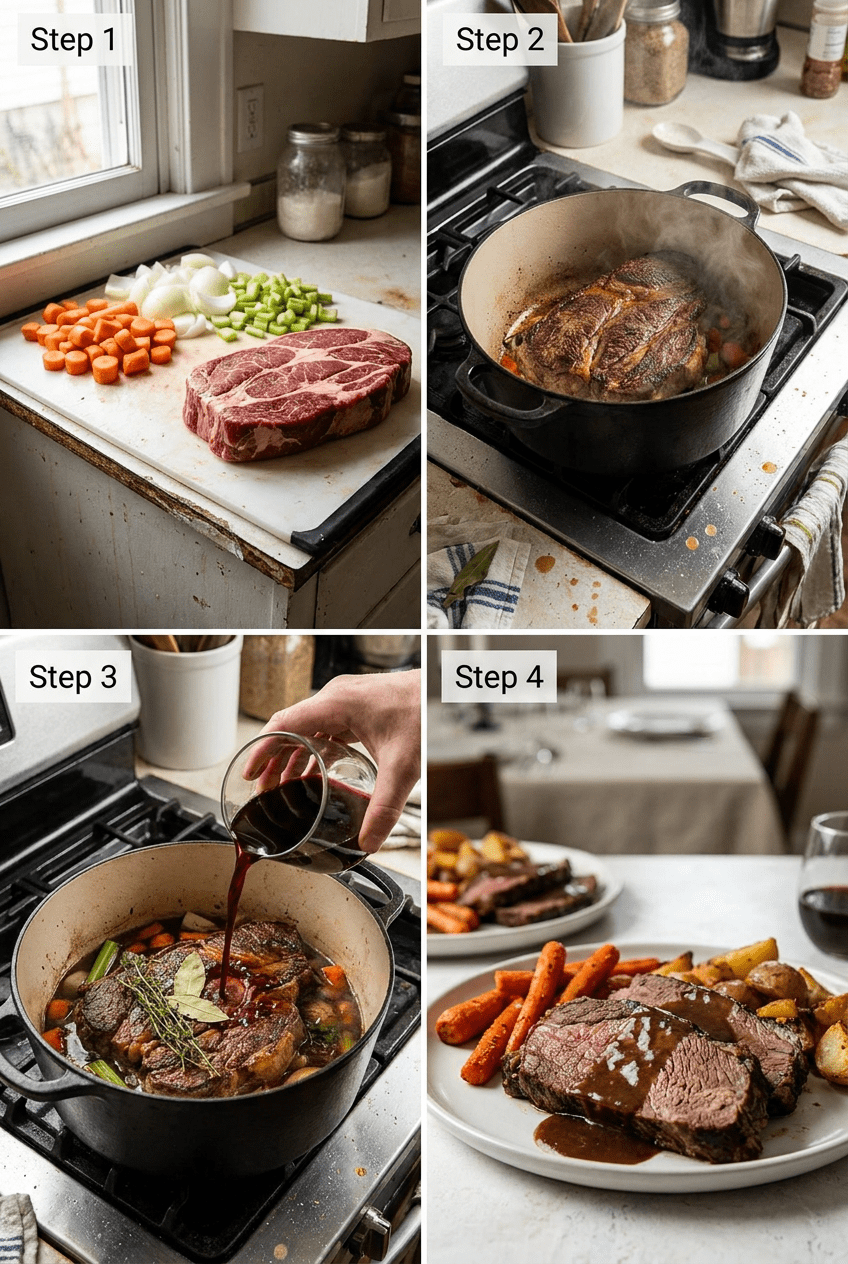
Phase 1: Setting the Foundation
Step 1: Preheat and season the beef
Set your oven to 300°F (150°C) now so that it is ready when you are. Take the chuck roast and pat it completely, obsessively dry with paper towels. Any surface moisture will steam instead of sear, so do not rush this part. Then season every side, including the edges, with the full tablespoon of kosher salt and two teaspoons of black pepper. Rub the seasoning into the meat firmly. Pro tip: Let the seasoned roast sit on the counter for about 30 minutes while you prep the vegetables. This allows the salt to start penetrating and brings the meat closer to room temperature for a more even sear.
Step 2: Sear the roast
Place a large Dutch oven over medium-high heat and pour in 2 tablespoons of oil. When you see the oil shimmer and it slides easily across the surface, you are ready. Carefully lower the roast into the pot, laying it away from you to avoid splatters. Now do not touch it for a full 4 to 5 minutes. Listen for a steady sizzle, and peek toward the end to check for a dark, chestnut brown crust. When that develops, flip and sear the other side for another 4 to 5 minutes. You want the same deep color on all sides, as this is where the foundation of the gravy flavor lives. Transfer the roast to a clean plate and set aside.
Phase 2: Building the Braising Liquid
Step 3: Sauté the aromatics
Reduce the heat to medium and add the remaining tablespoon of oil to the pot. Toss in the onion wedges, carrot chunks, and celery pieces. Stir everything around, scraping up some of the browned bits from the meat with a wooden spoon as the vegetables release their moisture. Cook for 7 to 8 minutes, until the onions are softened and the edges are just starting to caramelize. Add the smashed garlic cloves and the tomato paste, and stir continuously for one minute until the paste darkens slightly and the garlic is intensely fragrant. Pro tip: If the fond on the bottom is building up too much, a splash of water or a little stir from the vegetables will release it without burning.
Step 4: Deglaze and build braising liquid
Pour in the dry red wine and increase the heat to high. Bring it to a rolling boil, using your spoon to scrape every last bit of those flavor-packed brown bits off the bottom of the pot. Let the wine bubble away until it reduces by about half, which should take roughly 3 minutes. You will notice the sharp alcohol smell mellow into a rich, fruity aroma. Then pour in the beef broth and the Worcestershire sauce, and add the thyme sprigs and bay leaves. Give everything a gentle stir, then remove the pot from the heat for a moment.
Phase 3: The Low and Slow Braise
Step 5: Braise in the oven
Nestle the seared beef back into the pot, tucking it down among the vegetables. Pour in any juices that have collected on the plate. The liquid should come about halfway up the sides of the roast, so if it looks a little low, splash in a bit more broth. Cover the pot with a tight-fitting lid and carefully transfer it to the preheated oven. Let it braise undisturbed for 3.5 to 4 hours. After 3.5 hours, use a fork to test the meat. It should slide in with almost no resistance and twist apart easily. If you have an instant-read thermometer, you will want a temperature around 200 to 205°F (93 to 96°C) for that true pull-apart tenderness, though the meat is safe to eat at 145°F. The longer it goes, the more the collagen melts. Just be sure the liquid never fully evaporates; you can peek once and add a splash of water if needed. The aroma filling your kitchen at this point is pure anticipation.
Phase 4: Finishing with a Silky Gravy
Step 6: Rest and make the gravy
When the roast is done, lift it out carefully with two large forks or a spatula and place it on a cutting board. Tent it loosely with foil and let it rest while you make the gravy. Strain the cooking liquid through a fine-mesh sieve into a fat separator or a large measuring cup. Press gently on the solids to extract all the liquid, then discard the spent herbs and vegetables, though I like to rescue the carrots and set them aside for serving. Let the liquid settle for a minute, then skim off the layer of clear fat from the top. Return the now-empty Dutch oven to medium heat. Drop in the butter and let it melt, then whisk in the flour to form a smooth paste. Cook, whisking, for one minute to remove the raw flour taste. Gradually pour in the defatted cooking liquid, whisking constantly to prevent lumps. Bring the mixture to a gentle simmer and let it bubble, stirring occasionally, until the gravy thickens enough to coat the back of a spoon. Taste and season with salt and pepper as needed. Pro tip: If the gravy seems too thick, thin it with a little water or additional broth; if too thin, let it simmer a bit longer or use a cornstarch slurry.
Step 7: Slice and serve
Slice the rested roast against the grain into thick, half-inch pieces, taking care because the meat will be very delicate and likely crumbles at the edges. Arrange the slices on a warm serving platter, scatter the reserved carrots around, and ladle some of the glossy gravy over the top. Serve the remaining gravy in a warm sauceboat on the side. The first forkful, tangled with a bit of gravy and a buttery carrot, is exactly what home cooking is all about.
Pro Tips and Easy Variations for Your Classic Beef Pot Roast
Pro Tips
- Start with a well-marbled chuck roast. Look for good intramuscular fat webbing throughout the meat, which will melt during the braise and keep the roast succulent. Avoid cuts labeled “round” or “rump” for this particular recipe, as they lack the necessary marbling and can dry out.
- Do not skip the drying step. Any moisture left on the surface of the beef will create steam, preventing the Maillard reaction that gives you that deep brown crust. Pat it dry with paper towels until the meat feels almost tacky to the touch, then season immediately.
- Sear without moving the meat. It takes a solid 4 to 5 minutes of uninterrupted contact with the hot oil for the crust to release naturally. If you try to lift or peek too early, you may tear the surface and lose precious fond. Trust the process and wait until you see a dark, even color around the edges before flipping.
- Reduce the wine properly. Boiling the wine until it has reduced by half concentrates the flavor and burns off the raw alcohol notes. You will smell the change, from sharp and boozy to rich and slightly sweet. This step makes the gravy taste more rounded and complex.
- Use an instant-read thermometer for doneness. Tenderness is not about time alone, but about internal temperature. For pot roast, you want the meat to reach 200 to 205°F, the point where collagen has fully converted to gelatin. Check in the very center, avoiding any bone or large fat pockets. If the fork slides in with zero effort, it is ready.
- Let the gravy simmer until it coats a spoon. After whisking in the roux or slurry, allow the gravy to bubble gently for a few minutes so it can thicken to the perfect consistency. A good test is to dip a spoon in, then run your finger across the back; the line should hold mostly clean. If it runs over the line, keep simmering.
Delicious Variations
- One-Pot Meal with Potatoes. Add 1 pound of halved baby potatoes or scrubbed, large-diced Yukon Golds to the pot during the last 1.5 hours of cooking. They will soak up the braising liquid and become incredibly flavorful, making this a complete supper in a single vessel.
- Pressure Cooker Adaptation. After searing the roast and sautéing the vegetables directly in your electric pressure cooker, add the wine, broth, and herbs. Cook on high pressure for 60 minutes, then allow a natural release for 15 minutes before quick-releasing the rest. Make the gravy on the sauté setting afterward.
- Herb Swap. If you do not have fresh thyme, use a teaspoon of dried thyme, or get inventive with rosemary and a pinch of marjoram. A sprig of fresh rosemary tucked in alongside the thyme adds a wonderful piney note that works well with beef.
- Beer Braised Pot Roast. Swap the red wine for a dark beer such as stout or porter. The malty, slightly bitter notes create a different but equally delicious backdrop for the beef, and the gravy gains a subtle earthy depth.
- Root Vegetable Medley. Mix in parsnips, turnips, or whole shallots alongside the carrots for a colorful, sweet assortment. Cut them all to a similar size and add them at the same time as the original vegetables. The natural sugars will caramelize and infuse the gravy beautifully.
If you enjoy the deep, slow-cooked flavors of this dish, you might also appreciate the bright, flavorful notes of my Moroccan chicken tagine, another recipe where patience is rewarded tenfold. It shares the same magical transformation of humble ingredients into something spectacular.
Serving Suggestions for a Perfect American Dinner
This classic beef pot roast begs to be served with something that will catch every drop of that glorious gravy. Creamy mashed potatoes are the quintessential partner, their buttery smoothness contrasting beautifully with the rich meat. You could also pile the sliced beef over wide, buttered egg noodles or a mound of soft polenta. A side of simply steamed green beans or roasted Brussels sprouts adds a pop of green and a bit of brightness to the plate. For drinks, a glass of the same dry red wine you used in the braise makes a lovely pairing, or pour a dark, malty beer. Do not forget a crusty loaf of bread on the table for sopping up any remaining gravy, it would be a crime to leave it behind. Cover the platter with a light scattering of fresh chopped parsley just before bringing it to the table for a bit of color.
This meal feels tailor-made for a Sunday family dinner, but it is also a wonderful choice for a cozy dinner party where formality takes a back seat to warmth. You can easily double the recipe for a crowd if you have a large enough pot, just be sure not to overcrowd the meat during searing, doing batches instead. Leftovers, as you will see, are a gift, so making a little extra is never a bad idea. For a complete make-ahead holiday spread, prepare the pot roast a day in advance, alongside a tray of my blueberry lemon ricotta pancakes for a festive next-morning breakfast. The contrast of savory supper and sweet morning treat makes the whole occasion feel special.
Nutrition Information
(Approximate per serving, 8 servings total) Calories: 520, Fat: 30g, Carbohydrates: 12g, Protein: 47g, Fiber: 2g, Sodium: 750mg. Nutritional values are estimates only.
Storage and Make-Ahead Instructions
- Refrigerator. Store sliced beef completely submerged in the gravy in a shallow airtight container. This keeps the meat from drying out and allows the flavors to continue melding. It will stay fresh and delicious for up to 4 days. The vegetables can be stored alongside the meat if you like, or separate to keep their texture slightly firmer.
- Freezer. Place the cooled sliced beef and gravy in a freezer-safe container, pressing a piece of parchment paper directly onto the surface to prevent freezer burn. Seal tightly and freeze for up to 3 months. Thaw overnight in the refrigerator before reheating gently. The texture of the meat holds up remarkably well thanks to the protective gravy.
- Reheating. The best way to reheat pot roast is in a covered skillet or saucepan over medium-low heat, adding a splash of water or broth if the gravy has thickened too much. Stir occasionally until heated through, about 10 minutes. You can also use the microwave in 2-minute intervals, stirring between each, but the stovetop gives you better control and a more even result.
- Make-Ahead. The entire dish can be made one or even two days in advance. In fact, the flavors deepen and the gravy becomes even more harmonious after a night in the fridge. Reheat gently as described above. You can also sear the roast and sauté the vegetables the night before, then assemble everything in the Dutch oven, refrigerate, and start the braise the next morning when it is time to put it in the oven. Just add about 30 extra minutes to the oven time to account for the cold start.
Your Classic Beef Pot Roast Questions Answered
Can I make this classic beef pot roast recipe in a slow cooker?
Absolutely. After searing the roast and sautéing the vegetables, transfer everything to a slow cooker. Add the wine, broth, and herbs, cover, and cook on low for 8 to 10 hours or on high for 5 to 6 hours, until fork-tender. The gravy can be made afterward by straining the liquid and thickening it in a saucepan.
What is the best cut of beef for pot roast?
Chuck roast is the gold standard because of its fat marbling and connective tissue, which turns to gelatin during low and slow cooking. Other acceptable cuts include brisket or bottom round, but they tend to be leaner and may not achieve the same level of succulence. Always look for visible marbling.
How do I know when the pot roast is done?
Doneness is measured by tenderness, not time. The meat is ready when a fork can be inserted with zero resistance and twisted easily, shredding the meat. For precise measurement, use an instant-read thermometer to check that the internal temperature has reached 200 to 205°F, the sweet spot where collagen has fully broken down.
My gravy turned out thin. How can I fix it?
If your gravy is thin after whisking in the roux, let it simmer a bit longer while stirring. It should gradually thicken. Alternatively, make a slurry with 1 tablespoon cornstarch and 1 tablespoon cold water, then whisk it into the simmering liquid and cook for a minute. Repeat until the desired consistency is reached.
Can I make this dish gluten-free?
Yes. The only gluten-containing ingredient is the flour for the gravy. Simply replace the butter and flour roux with a cornstarch slurry (1 tablespoon cornstarch mixed with 1 tablespoon cold water per 2 tablespoons of flour). Whisk it into the cooking liquid at the end and simmer until thickened.
Why did my pot roast come out dry?
Dry pot roast usually means it was not cooked long enough. The collagen needs time and sustained heat to convert into gelatin and lubricate the meat fibers. Even if the meat reached a safe temperature, it might need more time to become tender. Next time, braise until absolutely fork-tender and never cut the cooking time short.
Can I skip the wine?
Yes, you can substitute the wine with an equal amount of additional beef broth plus 1 tablespoon of red wine vinegar. The vinegar provides the necessary acidity that wine normally brings, helping to balance the richness of the gravy. The flavor will be slightly less complex but still delicious.
How do I keep the vegetables from turning to mush?
Cut the root vegetables into large, chunky pieces of about 2 inches. This gives them body to withstand the long cooking time. If you find your carrots are softer than you like, you can add them halfway through the braise or keep some aside and simmer them separately in a little of the braising liquid for the last hour.
Is it necessary to sear the beef before braising?
Technically you could skip it, but I never would. Searing creates a deep, savory crust and builds the fond that flavors the entire dish. Without that step, the roast will be paler and the gravy will lack the same depth. It is one of the few steps that directly impacts the final taste in a big way.
Can I freeze the leftover pot roast and gravy?
Yes, and it freezes remarkably well. Store the sliced beef completely covered in gravy in a freezer container for up to 3 months. Thaw in the refrigerator overnight and reheat gently. The gravy may separate slightly upon thawing, but a good stir while heating brings it back together.
More Incredible American Recipes to Try
If this classic beef pot roast recipe earned a permanent spot in your dinner rotation, I think you will adore some of the other comforting, soul-satisfying recipes on my blog. For another slow-cooked masterpiece, my Moroccan chicken tagine takes a different flavor journey with warm spices, olives, and preserved lemons, all melded together with the same patient, gentle heat. It is a wonderful way to travel the world from your own kitchen while maintaining that same sense of aromatic, cozy satisfaction.
If you are looking for a dish that feels just as celebratory but with a completely different personality, the fluffy Japanese souffle pancakes are an absolute delight. They are impossibly light and jiggly, a sweet treat that makes any morning
Classic Beef Pot Roast
Ingredients
Method
- Preheat oven to 300°F (150°C). Pat the chuck roast completely dry with paper towels. Season aggressively on all sides with kosher salt and black pepper.
- Heat 2 tablespoons of oil in a large Dutch oven over medium-high heat until shimmering. Carefully lay the roast in and sear without moving until a dark brown crust forms, about 4-5 minutes per side. Transfer to a plate.
- Reduce heat to medium. Add the remaining 1 tablespoon oil, then onions, carrots, and celery. Cook, stirring occasionally, until softened and starting to brown, about 7-8 minutes. Add garlic and tomato paste, stirring for 1 minute until fragrant.
- Pour in the red wine and bring to a boil, scraping up all the browned bits from the bottom. Let it reduce by half, about 3 minutes. Stir in beef broth, Worcestershire sauce, thyme sprigs, and bay leaves.
- Return the seared beef and any accumulated juices to the pot, nestling it among the vegetables. The liquid should come about halfway up the meat; add a splash more broth if needed. Cover with a tight-fitting lid and transfer to the oven. Cook for 3.5 to 4 hours, or until the meat is fork-tender and an instant-read thermometer inserted into the thickest part registers at least 145°F (63°C); for pull-apart tenderness, target 200–205°F (93–96°C).
- Carefully transfer the roast to a cutting board and tent loosely with foil. Strain the cooking liquid into a fat separator or large measuring cup; discard solids (or keep carrots to serve). Skim off excess fat. In the now-empty Dutch oven over medium heat, melt the butter, whisk in the flour (or cornstarch slurry), and cook for 1 minute. Slowly whisk in the defatted cooking liquid and bring to a simmer, stirring until thickened to a gravy consistency. Season to taste.
- Slice the beef against the grain into thick slices. Arrange on a platter with the reserved carrots and any other vegetables you kept. Ladle some gravy over the top and serve the rest on the side.
Disclosure: This post may contain affiliate links. If you purchase through our links we may earn a small commission at no extra cost to you.
If you made this Classic Beef Pot Roast, please leave a comment below and let me know how it turned out.