Cheesy Mexican Ground Beef and Rice Skillet Recipe, Easy Mexican Dinner in 45 Minutes
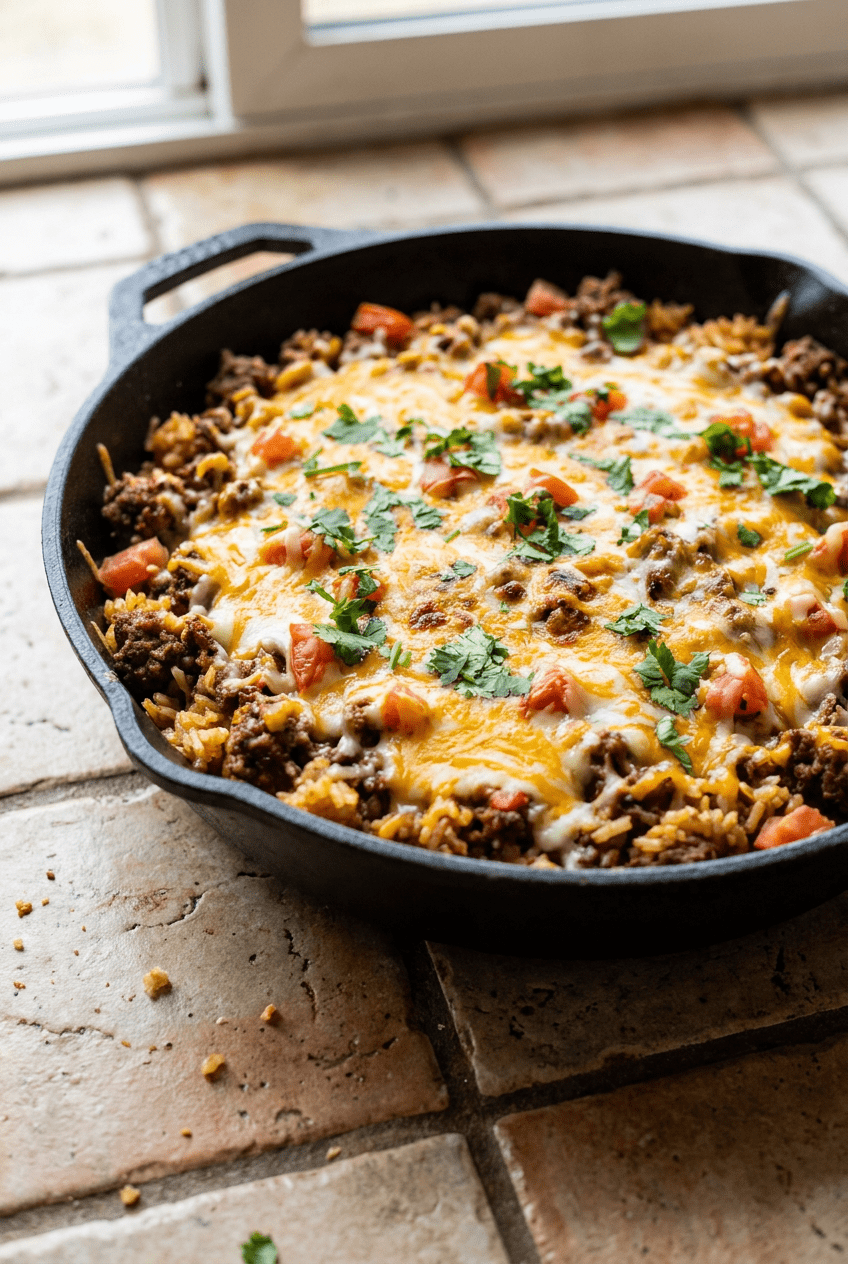
Table of Contents
- Cheesy Mexican Ground Beef and Rice Skillet: A One Pan Wonder Packed With Bold Tex Mex Flavors
- Why You Will Love This Cheesy Mexican Ground Beef and Rice Skillet Recipe
- Your Simple Ingredients for the Perfect Cheesy Mexican Ground Beef and Rice Skillet
- How to Make Perfect Cheesy Mexican Ground Beef and Rice Skillet
- Pro Tips and Easy Variations for Your Cheesy Mexican Ground Beef and Rice Skillet
- Serving Suggestions for a Perfect Dinner
- Nutrition Information
- Storage and Make Ahead Instructions
- Your Cheesy Mexican Ground Beef and Rice Skillet Questions Answered
- More Incredible Mexican Recipes to Try
- The Story Behind This Recipe
- Pin This Recipe for Later
Cheesy Mexican Ground Beef and Rice Skillet: A One Pan Wonder Packed With Bold Tex Mex Flavors
There are certain recipes that just feel like a warm hug after a long day, and this cheesy mexican ground beef and rice skillet recipe is exactly that kind of meal. I first made this dish on a hectic Tuesday evening when my refrigerator held little more than a pound of ground beef, some aging vegetables, and a block of sharp cheddar. I had no plan and even less energy, but I did have a cast iron skillet and a deep craving for something comforting. I started browning the beef, tossed in an onion, and before I knew it the whole kitchen smelled like cumin, chili powder, and sizzling garlic. Twenty five minutes later I pulled the lid off that skillet and saw perfectly tender rice studded with corn and black beans, all blanketed under a layer of melted cheese, and I knew I had stumbled onto something truly special. That one accidental dinner has since become a cornerstone of our family meal rotation, requested constantly and tweaked endlessly until it reached the version I am sharing with you today.
What sets this homemade Cheesy Mexican Ground Beef and Rice Skillet apart from countless other one pot meals is the intentional technique of toasting the rice before adding any liquid. When you let those grains sizzle in the rendered beef fat and spices for just sixty seconds, something remarkable happens. The outer starches begin to toast, creating a subtle nuttiness that adds incredible depth, and the grains become coated in a thin layer of oil that helps them stay separate and distinct rather than clumping into a sticky mass. This small step, which takes almost no extra time, transforms the texture of the finished dish from simple weeknight survival food into something that tastes deliberate and deeply satisfying. The other secret lies in the choice of diced tomatoes with green chilies, which bring both acidity and gentle heat in a single convenient can. That little touch of fire roasted green chili flavor weaves through every bite, brightening the richness of the beef and cheese without overpowering anything. If you have ever been a fan of recipes that feel like they took hours but actually clock in under forty five minutes, you might also love the comforting warmth found in a well made Moroccan chicken tagine, which similarly relies on layered spices and gentle simmering to develop extraordinary flavor.
This recipe is perfect for anyone who needs to get a genuinely satisfying dinner on the table without spending their entire evening in the kitchen. Parents who are juggling homework and bath time will appreciate that the whole thing happens in one pan, which means fewer dishes to wash later. Beginner cooks will find confidence in the straightforward steps and clear visual cues that signal exactly when to move to the next stage. And anyone who loves bold Tex Mex flavors but wants something heartier than tacos or enchiladas will discover their new favorite comfort food. Make it for a casual family dinner, bring it to a potluck where you want to impress without fuss, or cook it on a Sunday afternoon and portion it out for easy lunches all week long. However you serve it, this dish delivers the kind of satisfaction that makes people ask for seconds before they have even finished their first bowl.
Why You Will Love This Cheesy Mexican Ground Beef and Rice Skillet Recipe
- Everything cooks in a single skillet. From browning the beef to melting the cheese, the entire recipe happens in one pan. This means you spend less time scrubbing dishes and more time enjoying your evening.
- Bold, balanced Tex Mex flavor in every bite. The combination of cumin, chili powder, smoked paprika, and diced tomatoes with green chilies creates layers of warmth and gentle heat. Each forkful tastes like it simmered for hours, even though it comes together quickly.
- Perfectly fluffy rice every time. Toasting the rice before adding liquid and keeping the lid tightly sealed during simmering guarantees tender, separate grains. You will never end up with a mushy mess if you follow these simple techniques.
- Incredibly budget friendly without tasting like it. Ground beef, rice, canned beans, and frozen corn are all affordable pantry staples. Yet the finished dish feels rich, cheesy, and completely satisfying in a way that belies its humble ingredients.
- Highly adaptable to what you have on hand. You can swap the protein, adjust the spice level, add extra vegetables, or make it dairy free without losing the soul of the dish. This recipe is a template that welcomes your creativity.
- Leftovers taste even better the next day. As the rice and spices sit together overnight, the flavors deepen and meld into something even more delicious. You will genuinely look forward to lunch the next morning.
Your Simple Ingredients for the Perfect Cheesy Mexican Ground Beef and Rice Skillet
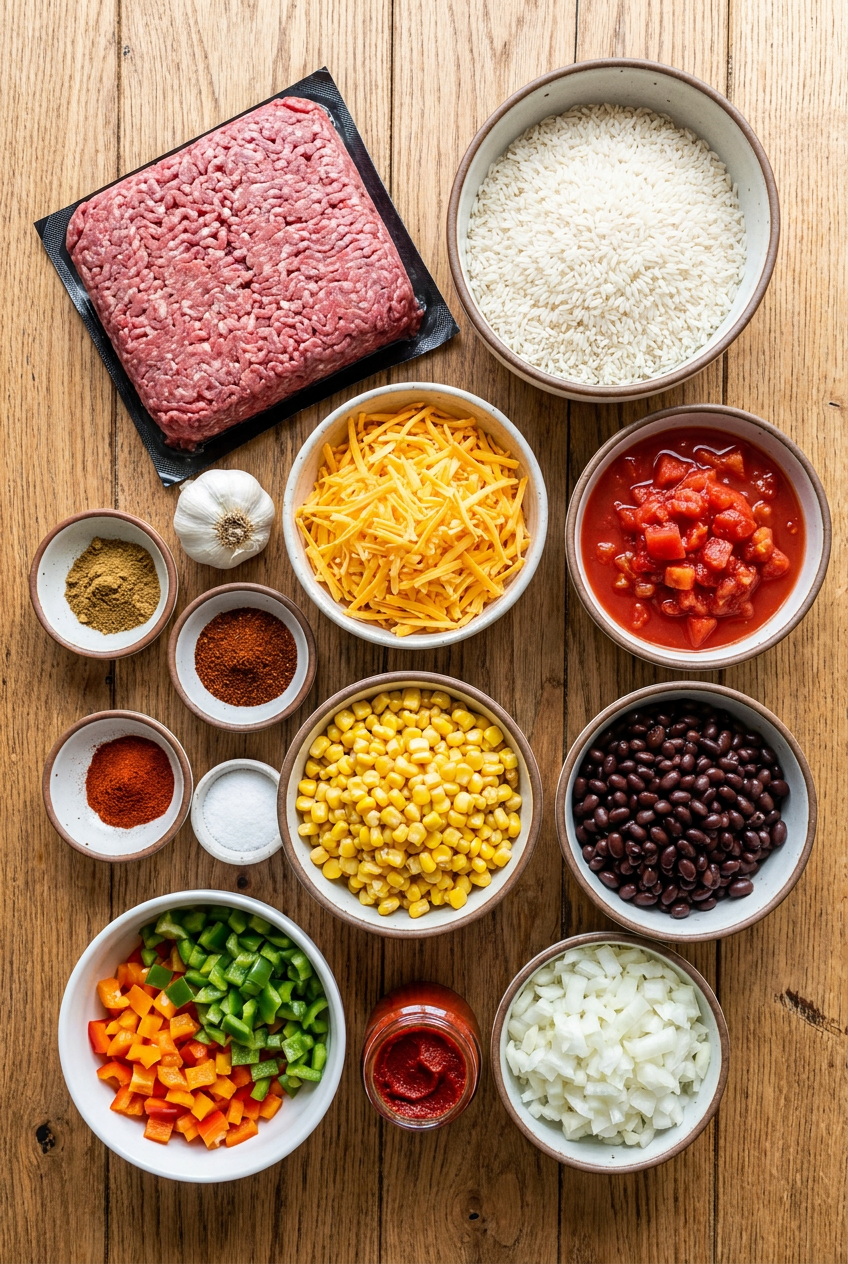
Main Ingredients
- 1 lb lean ground beef (85/15)
- 1 medium yellow onion, diced
- 3 cloves garlic, minced
- 1 cup long grain white rice, uncooked
- 1 can (14.5 oz) diced tomatoes with green chilies, undrained
- 1 can (15 oz) black beans, drained and rinsed
- 1 cup frozen corn kernels, thawed
- 1.5 cups beef broth, low sodium
- 1 tsp ground cumin
- 1 tsp chili powder
- ½ tsp smoked paprika
- Salt and black pepper to taste
For Topping
- 1 cup shredded sharp cheddar cheese
- ¼ cup fresh cilantro, chopped
- 1 avocado, diced
- ½ cup sour cream, optional
Ingredient Notes
Lean Ground Beef. Using 85/15 ground beef gives you enough fat to develop rich flavor as the meat browns, but not so much that the finished dish becomes greasy. After browning, you can drain any excess fat if the skillet looks overly oily. If you prefer a leaner option, 90/10 works well too, just take care not to overcook it since it can dry out faster. For a completely different protein, ground turkey or ground chicken both substitute nicely, though you may want to add a small drizzle of oil to the pan since those meats are very lean. The beef serves as the savory backbone of this easy Cheesy Mexican Ground Beef and Rice Skillet, providing substance and heartiness that satisfies even the biggest appetites.
Long Grain White Rice. This specific type of rice is the only one I recommend for the exact cooking time and liquid ratio in this recipe. Long grain rice has a firm structure that holds up beautifully to simmering without turning mushy, and the grains stay fluffy and separate when fluffed with a fork at the end. Jasmine rice, which is a type of long grain rice, works wonderfully here and adds a subtle floral note. Basmati rice can also work, though its texture is slightly drier. Do not use short grain rice, sushi rice, or arborio rice, as those varieties release too much starch and will create a gluey texture rather than the light, pilaf style result we are after. If you only have brown rice, you can use it but must adjust the liquid to about 2¼ cups of broth and increase the simmer time to 40 to 45 minutes, checking for tenderness.
Diced Tomatoes with Green Chilies. This canned ingredient is an absolute powerhouse in this best Cheesy Mexican Ground Beef and Rice Skillet recipe. The tomatoes break down slightly during simmering and contribute acidity that balances the richness of the beef and cheese, while the green chilies lend a gentle, smoky heat without being aggressively spicy. Do not drain the can. You want all those juices to become part of the cooking liquid that the rice absorbs. If you cannot find the version with green chilies, you can use plain diced tomatoes and add a small 4 ounce can of diced green chilies separately, or throw in a minced fresh jalapeño when you sauté the onion for a brighter, grassier heat.
Black Beans. Draining and rinsing canned black beans removes excess sodium and that thick, starchy liquid that can muddy the appearance of the final dish. The beans add creamy texture, plant based protein, and extra fiber that makes each serving more filling. Pinto beans or kidney beans work just as well if that is what you have in the pantry. You could even omit the beans entirely and add an extra half cup of corn or some diced bell pepper to maintain volume.
Sharp Cheddar Cheese. I specify sharp cheddar because its pronounced tang stands up to the bold spices and tomatoes better than mild cheddar would. The sharpness cuts through the richness and adds another layer of flavor complexity. For the smoothest melt, shred your cheese from a block rather than using pre shredded bags, which are coated in anti caking agents that can make the cheese melt unevenly or turn slightly grainy. Pepper jack, Monterey jack, or a Mexican blend are all fantastic alternatives if you want to experiment with different cheese flavors.
Smoked Paprika. This spice might seem like a small addition, but it makes a meaningful difference. Regular paprika provides color, but smoked paprika brings an actual smoky depth that mimics the flavor of food cooked over a fire. It pairs beautifully with the cumin and chili powder, adding a subtle barbecue note that makes the whole dish taste more complex. If you only have sweet paprika, use it, but consider adding a tiny pinch of chipotle powder if you have it, just enough to introduce that whisper of smoke.
How to Make Perfect Cheesy Mexican Ground Beef and Rice Skillet
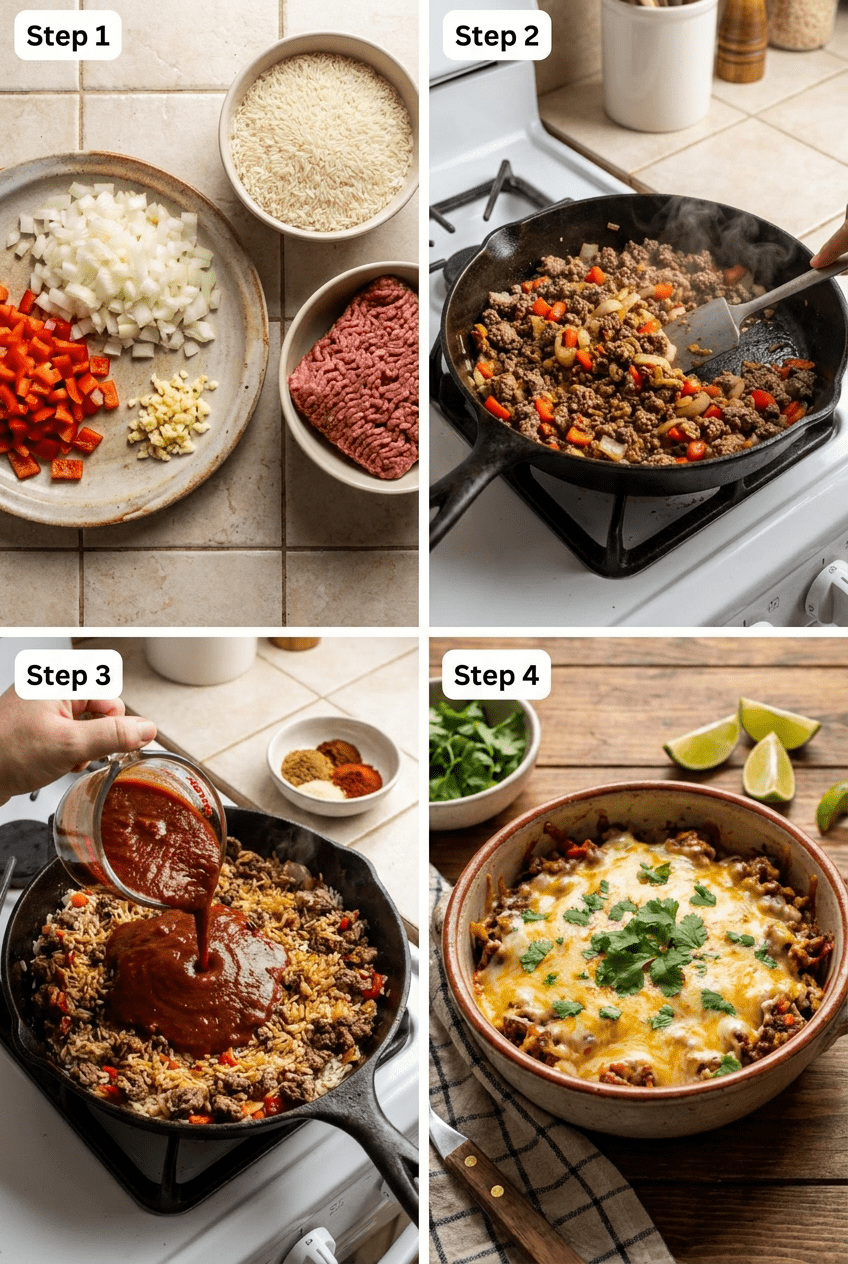
Phase 1: Building the Flavor Base
Step 1: Brown the Beef
Place a large skillet over medium high heat and add the ground beef. Spread it into an even layer across the surface of the pan and let it cook without stirring for a full two minutes. You will hear a steady sizzle, and you will smell the meat beginning to caramelize. After those two minutes, start breaking the beef into crumbles with a wooden spoon and continue cooking until no pink remains, which takes about five to six minutes total, and the internal temperature reaches 160°F. Listen for the sound to shift from a wet steaming to a sharper crackle, which tells you the moisture has evaporated and true browning has begun. If excess fat has pooled in the pan, spoon it out now or carefully tilt the skillet and blot it with a paper towel. Pro tip: Letting the beef develop a slight crust before you stir it creates thousands of tiny browned bits that become the foundation of deep, savory flavor throughout the whole dish.
Step 2: Sauté Aromatics
Add the diced onion directly to the skillet with the browned beef. Stir it around and cook for three to four minutes, watching as the onion pieces turn from opaque white to glossy and translucent. The onion will pick up the browned bits from the bottom of the pan, deglazing it naturally with its own released moisture. When the onion looks soft and you can smell its sweetness mingling with the beef, add the minced garlic. Cook for exactly thirty seconds, stirring constantly. The garlic should become intensely fragrant but not brown, as burned garlic tastes bitter and acrid. Pro tip: Use your spoon to actively scrape the bottom of the pan while the onion cooks. Those stuck on beef bits are pure flavor that you want to lift and incorporate, not leave behind.
Step 3: Toast the Rice
Add the uncooked rice, ground cumin, chili powder, and smoked paprika directly into the skillet. Stir everything together constantly for one full minute. You will see the rice grains turning from translucent to slightly opaque white around the edges, and you will smell the spices blooming in the residual heat of the pan. This toasting step does two crucial things. First, it coats each grain of rice in the seasoned fat, which helps the grains remain separate during cooking. Second, it develops a subtle nutty aroma that makes the finished dish taste far more complex than if you simply dumped the rice into liquid. Pro tip: Do not skip this step even if you are in a hurry. That single minute of toasting is the difference between good rice and rice that tastes like it came from a restaurant kitchen.
Phase 2: Simmering to Perfection
Step 4: Add Liquids and Vegetables
Pour in the entire can of diced tomatoes with green chilies, including all the juices. Add the beef broth, the drained and rinsed black beans, and the thawed corn kernels. Season with a generous pinch of salt and several cracks of black pepper. Stir everything to combine evenly. Look at the liquid level. The rice should be fully submerged, with the liquid rising just barely above the solid ingredients. If some grains are poking out, press them down gently with your spoon. The ratio of liquid to rice in this recipe has been tested carefully, so trust it. Pro tip: Use low sodium beef broth so you can control the final salt level. You can always add more salt at the end, but you cannot take it away once it is stirred in.
Step 5: Simmer Until Tender
Turn the heat up to high and bring the mixture to a full rolling boil. You will see large bubbles breaking across the surface steadily and hear an active bubbling sound. As soon as you reach that point, immediately reduce the heat to the lowest setting your stove can manage. Place a tight fitting lid on the skillet and set a timer for 18 minutes. Do not lift the lid during this time, not even for a quick peek. Every time you lift the lid, you release the steam that the rice needs to cook properly, and you risk ending up with unevenly cooked grains that are hard in the center. At the 18 minute mark, quickly lift the lid and taste a few grains of rice from the center of the pan. They should be tender with no chalky center. If they still have a slight crunch, replace the lid and give it two more minutes. Pro tip: If you are cooking on an electric stove, the residual heat from the burner can continue cooking even after you turn it to low. Consider moving the skillet partially off the burner if your stove runs hot. The same patience that rewards you when making fluffy Japanese souffle pancakes applies here, though the technique is obviously very different.
Phase 3: Finishing Touches
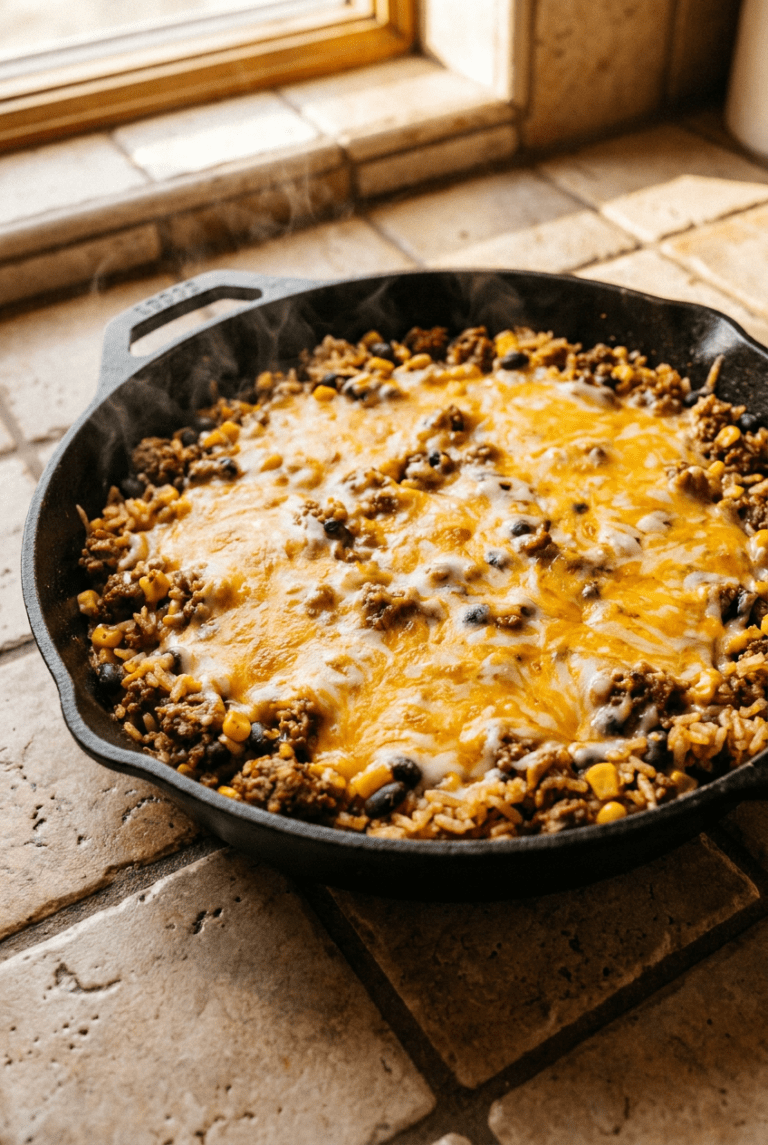
Step 6: Add Cheese and Rest
Remove the skillet from the heat entirely. Take off the lid and fluff the rice mixture with a fork, gently lifting and separating the grains rather than stirring aggressively. Sprinkle the shredded sharp cheddar evenly across the entire surface. Place the lid back on and let the skillet sit undisturbed for five full minutes. The residual heat trapped under the lid will gently melt the cheese into a glossy, creamy blanket. This resting period also allows the rice to firm up slightly and the flavors to settle into a more harmonious balance. Pro tip: Shredding your own cheese from a block is worth the extra two minutes of effort. Pre shredded cheese contains starches that prevent clumping in the bag, but those same starches can make your melted cheese layer slightly grainy rather than silky smooth.
Step 7: Garnish and Serve
Remove the lid and admire your work. Sprinkle the chopped fresh cilantro across the top, then scatter the diced avocado over everything. Add dollops of sour cream if you are using it. Bring the whole skillet to the table and serve directly from the pan, letting people scoop their own portions. The contrast of the hot, cheesy rice against the cool, creamy avocado and sour cream is absolutely wonderful. Pro tip: Set out a bowl of tortilla chips alongside the skillet for scooping. The crunch adds another texture that makes the meal even more fun and interactive.
Pro Tips and Easy Variations for Your Cheesy Mexican Ground Beef and Rice Skillet
Pro Tips
- Use a wide, shallow skillet for best results. A pan with a diameter of at least 12 inches gives the rice more surface area, which helps moisture evaporate at the right rate and prevents the rice from steaming into mush. A deep pot traps too much moisture and can lead to a wet, sticky texture.
- Let beef develop a proper crust before stirring. Patience during the browning step pays off enormously. When you spread the beef flat and leave it alone, the contact with the hot metal creates Maillard reaction compounds that taste deeply savory and meaty. Stirring too soon just steams the meat gray.
- Always toast your spices with the rice. Dry spices like cumin and chili powder contain fat soluble flavor compounds that bloom and intensify when heated in oil. Adding them to the pan during the rice toasting step unlocks their full aromatic potential rather than leaving them tasting raw and dusty.
- Rest the skillet off heat even after the cheese melts. Those five minutes of covered resting are not just for melting cheese. The rice continues to absorb any remaining moisture, the grains firm up to the perfect texture, and the entire dish cools slightly to an ideal eating temperature.
- Shred your own cheese from a block. Block cheese melts into a smooth, creamy, stretchy layer. Pre shredded cheese is coated with cellulose and potato starch to prevent clumping, but those additives interfere with melting and can leave you with a waxy or gritty texture.
- Measure your rice and liquid precisely. This is not the time to eyeball. The ratio of 1 cup of rice to roughly 2 cups of total liquid, counting the tomato juices and broth, has been calibrated for perfect absorption. Too much liquid makes porridge, too little leaves hard crunchy grains that cannot recover.
Delicious Variations
- Spicy Chipotle Version. Add two minced chipotle peppers in adobo sauce along with the garlic. The smoky, fiery heat transforms the dish into something bolder and more intense. Reduce the chili powder slightly so the chipotle flavor can shine through without overwhelming heat.
- Loaded Vegetable Skillet. Sauté a diced bell pepper and a diced zucchini along with the onion. This adds color, nutrients, and a subtle sweetness that complements the spices beautifully. You may need to add an extra splash of broth since the vegetables release more moisture during cooking.
- Ground Turkey Lighter Option. Swap the ground beef for lean ground turkey. Since turkey is leaner, add a tablespoon of olive oil to the pan before browning to prevent sticking and help develop color. The spices carry the flavor beautifully, so you will not miss the beef fat at all.
- Creamy Queso Style Finish. After the cheese melts, drizzle a few tablespoons of heavy cream or evaporated milk over the top and gently fold it in. This creates an even richer, more indulgent dish that tastes almost like a deconstructed queso dip mixed with hearty rice.
- Breakfast Skillet Twist. Leftovers make an incredible breakfast. Reheat a portion in a skillet, make a few wells in the rice, and crack eggs into them. Cover and cook until the eggs are set, then top with avocado and hot sauce for a morning meal that will keep you full until lunch.
If you enjoy the savory satisfaction of this skillet, you might also appreciate the bright, tangy contrast found in blueberry lemon ricotta pancakes, which offer a completely different but equally rewarding homemade comfort food experience.
Serving Suggestions for a Perfect Dinner
This cheesy mexican ground beef and rice skillet is a complete meal all by itself, but a few thoughtful additions can turn it into an even more memorable dinner. I love setting out small bowls of toppings and letting everyone customize their own plate. Diced avocado, chopped cilantro, a dollop of sour cream, and a generous squeeze of fresh lime juice are the classic accompaniments that add brightness and creaminess. For some crunch, serve with a big pile of warm tortilla chips on the side for scooping. The contrast between the soft, cheesy rice and the crispy, salty chips is completely irresistible. A simple side salad of shredded romaine with a cumin lime vinaigrette cuts through the richness nicely without adding much work. For drinks, a cold Mexican beer with a lime wedge, a tart margarita, or even a tall glass of horchata pairs beautifully with the Tex Mex flavors.
This skillet shines on busy weeknights when you need to feed a hungry family with minimal effort, but it is equally at home at casual gatherings. If you are hosting a game day party or a potluck, double the recipe in a very large skillet or a wide Dutch oven and let guests serve themselves straight from the pan. It holds well on a warm buffet for up to an hour, just keep the lid on to retain heat and moisture. The recipe scales up easily. Simply multiply all ingredients proportionally and increase the simmer time by about five minutes to account for the larger volume. For a complete meal that feels extra special, start with a small appetizer of guacamole and chips, serve the skillet as the main event, and finish with a light dessert like cinnamon dusted churros or a scoop of vanilla ice cream drizzled with caramel. The combination of savory, cheesy rice followed by something sweet is always a crowd pleaser.
Nutrition Information
(Approximate per serving, 4 servings total) Calories: 480, Fat: 18g, Carbohydrates: 45g, Protein: 28g, Fiber: 6g, Sugar: 5g, Sodium: 620mg. Nutritional values are estimates only and will vary based on specific ingredients used.
Storage and Make Ahead Instructions
- Refrigerator: Transfer cooled leftovers to an airtight container and refrigerate for up to 4 days. The rice will absorb additional moisture as it sits, so the texture becomes slightly softer but the flavors deepen beautifully. I actually think it tastes even better on day two.
- Freezer: For longer storage, portion the cooled skillet mixture into freezer safe containers or heavy duty zip top bags, pressing out as much air as possible. Freeze for up to 3 months, but do not add the fresh toppings like avocado, cilantro, or sour cream before freezing. Those should be added fresh when you serve. The cheese freezes fine melted into the rice.
- Reheating: The best method is to reheat individual portions in the microwave for about 2 minutes, stirring halfway through, until steaming hot throughout. For larger portions, reheat on the stovetop in a skillet over medium low heat with a splash of beef broth or water to restore moisture. Stir occasionally and heat until the internal temperature reaches 165°F. The added liquid prevents the rice from drying out.
- Make Ahead: You can dice the onion, mince the garlic, shred the cheese, and measure out all the spices up to 24 hours in advance. Store the prepped vegetables together in one container in the refrigerator, the cheese in another, and have your spice blend measured into a small bowl. You can also brown the beef a day ahead and refrigerate it, which shaves about eight minutes off your cooking time on the day you plan to serve the dish.
Your Cheesy Mexican Ground Beef and Rice Skillet Questions Answered
Can I use brown rice instead of white rice?
Yes, you can substitute brown rice, but you must adjust the cooking liquid and time. Use 2¼ cups of beef broth instead of 1.5 cups, and increase the covered simmer time to 40 to 45 minutes. Brown rice has a tougher bran layer that requires more moisture and time to soften. Check for tenderness at the 40 minute mark and give it more time if the grains are still chewy.
How can I make this recipe dairy free?
Omitting the cheese and sour cream entirely is the simplest approach, and the dish still tastes fantastic thanks to the bold spices and vegetables. If you want that creamy, cheesy element, use your favorite dairy free shredded cheese alternative and a plant based sour cream. Many brands melt well when covered with a lid to trap steam, just follow the same resting step for 5 minutes off heat.
Why did my rice turn out mushy?
Mushy rice is almost always caused by one of three things: too much liquid, lifting the lid repeatedly during the simmering phase, or overcooking. Measure your broth and tomato juices carefully, use a timer, and resist the urge to peek. The steam trapped under the lid is essential for even cooking. If your stove runs hot even on low, consider moving the skillet partially off the burner to reduce the heat.
Can I make this recipe ahead and reheat it later?
Absolutely. This dish reheats beautifully and the flavors often deepen overnight in the refrigerator. Make the entire recipe as written, let it cool, then store in an airtight container for up to 4 days. Reheat individual portions in the microwave or on the stovetop with a splash of broth. Add fresh toppings like avocado, cilantro, and sour cream just before serving for the best texture and flavor contrast.
What kind of skillet should I use?
A wide, shallow skillet with a tight fitting lid is ideal. I recommend a 12 inch stainless steel or cast iron skillet. Nonstick also works, but you will not develop quite as much of the flavorful browned bits on the beef. Whatever you choose, make sure it has a lid that seals well to trap steam during the rice cooking phase. A deep pot with a narrow base can trap too much moisture and lead to wetter rice.
Can I add more vegetables to this dish?
Yes, this recipe welcomes extra vegetables. Diced bell peppers, zucchini, or even a handful of fresh spinach stirred in at the end work beautifully. Add firmer vegetables like peppers or zucchini along with the onion so they have time to soften. Leafy greens like spinach should be stirred in right before adding the cheese so they just wilt from residual heat without overcooking.
How do I know when the rice is fully cooked?
The most reliable method is to taste a few grains from the center of the skillet at the 18 minute mark. Properly cooked long grain white rice should be tender all the way through with no hard or chalky center. The grains should be fluffy and separate, not clumped or sticky. If there is still liquid visible or the rice is crunchy, replace the lid and cook in 2 minute increments until tender.
Is this recipe spicy?
The base recipe has a gentle, warming heat from the chili powder and the diced tomatoes with green chilies, but it is not aggressively spicy. Most people, including children, find it comfortably mild. If you want more heat, add diced fresh jalapeños with the onion, increase the chili powder, or add a pinch of cayenne. If you are very sensitive to spice, use plain diced tomatoes without green chilies and reduce the chili powder by half.
Can I use another type of cheese?
Sharp cheddar gives the best balance of tang and meltability, but many other cheeses work wonderfully. Pepper jack adds extra heat, Monterey jack melts beautifully into a creamy layer, and a Mexican blend or queso quesadilla cheese also work. Avoid very hard aged cheeses like Parmesan as a topping since they will not melt smoothly. Whatever you choose, shred it from a block for the best melting results.
How can I reduce the sodium in this recipe?
Use low sodium beef broth and no salt added diced tomatoes. Rinse the black beans thoroughly under running water to remove excess sodium from the canning liquid. Season lightly with salt during cooking and taste at the end before adding more. The spices, garlic, and onion provide so much flavor that you may find you need less salt than you expect.
More Incredible Mexican Recipes to Try
If this cheesy Mexican ground beef and rice skillet spoke to your soul, there is a whole world of vibrant Mexican and Tex Mex recipes waiting for you to explore. The beauty of this cuisine lies in its bold, confident use of spices, its celebration of humble ingredients, and its ability to bring people together around a shared table. One pot and one pan meals like this skillet are a lifesaver for busy households, but Mexican cooking also offers incredible slow simmered dishes, fresh and zesty salads, and an endless variety of tacos and enchiladas that are perfect for weeknight dinners or festive gatherings.
For a completely different texture experience that still satisfies that craving for something warm and comforting, consider trying your hand at wonderfully airy and delicate fluffy Japanese souffle pancakes for a weekend breakfast or brunch. If you are drawn to the deep, spiced, slowly simmered flavors that make this skillet so satisfying, you will likely fall in love with a traditional Moroccan chicken tagine, which shares that same spirit of layering warm spices with tender protein in a single pot. And for another skillet recipe that combines fruit with rich, satisfying flavor, the blueberry lemon ricotta pancakes are an absolute revelation on lazy mornings.
The Story Behind This Cheesy Mexican Ground Beef and Rice Skillet
This recipe sits squarely in the tradition of Tex Mex cooking, a beloved cuisine that emerged from the borderlands of Texas and northern Mexico. Tex Mex food is characterized by its generous use of beef, shredded cheese, cumin, and wheat flour, ingredients that reflect the culinary traditions of both cultures meeting and mingling over generations. The concept of cooking rice directly in a skillet with meat, beans, and tomatoes echoes the Mexican tradition of arroz a la mexicana, or Mexican
Cheesy Mexican Ground Beef and Rice Skillet
Ingredients
Method
- In a large skillet over medium-high heat, cook the ground beef, breaking it into crumbles, until browned and internal temperature reaches 160°F (71°C), about 5-6 minutes. Drain excess fat if needed.
- Add diced onion to the skillet and cook until translucent, 3-4 minutes. Stir in garlic and cook for 30 seconds until fragrant.
- Add uncooked rice, cumin, chili powder, and smoked paprika. Stir constantly for 1 minute to toast the rice and coat the grains in oil and spices.
- Pour in diced tomatoes with their juices, beef broth, black beans, and corn. Season with salt and pepper to taste. Stir to combine.
- Bring the mixture to a boil, then reduce heat to low. Cover with a tight-fitting lid and simmer for 18-20 minutes, or until rice is tender and liquid is absorbed.
- Remove skillet from heat. Fluff the rice mixture with a fork, sprinkle shredded cheese evenly on top, and cover again. Let sit for 5 minutes to melt the cheese and let flavors settle.
- Top with chopped cilantro, diced avocado, and a dollop of sour cream if desired. Serve hot directly from the skillet.
Disclosure: This post may contain affiliate links. If you purchase through our links we may earn a small commission at no extra cost to you.
If you made this Cheesy Mexican Ground Beef and Rice Skillet, please leave a comment below and let me know how it turned out.